Hello, long time no entry.
I don't get to come on here as often as I would like to, but I had to show the Team swaps I made for our latest Stampin' Up! get together in Telford last weekend.
Oh what a fabulous weekend it was. We got to spend three days with our Stampin' Up! family. Lots of fun, crafting and swapping of items we have made with others for new ideas.
My team swap was inspired by a German demo called Stampin Fee. Her address is http://stampin-fee.jimdo.com/anleitungen/adventskranz-to-go/ I would recommend you go and have a look at her lovely blog.
I used the latest Cookie Cutter DSP from Stampin' Up!
If you would like to see any products, I have an online catalogue (link at the top of my blog page).
Well here are the photos of my swaps.
Lots of people said they loved them. I have been making more to sell at a craft fair later this month.
Here are a few other examples.
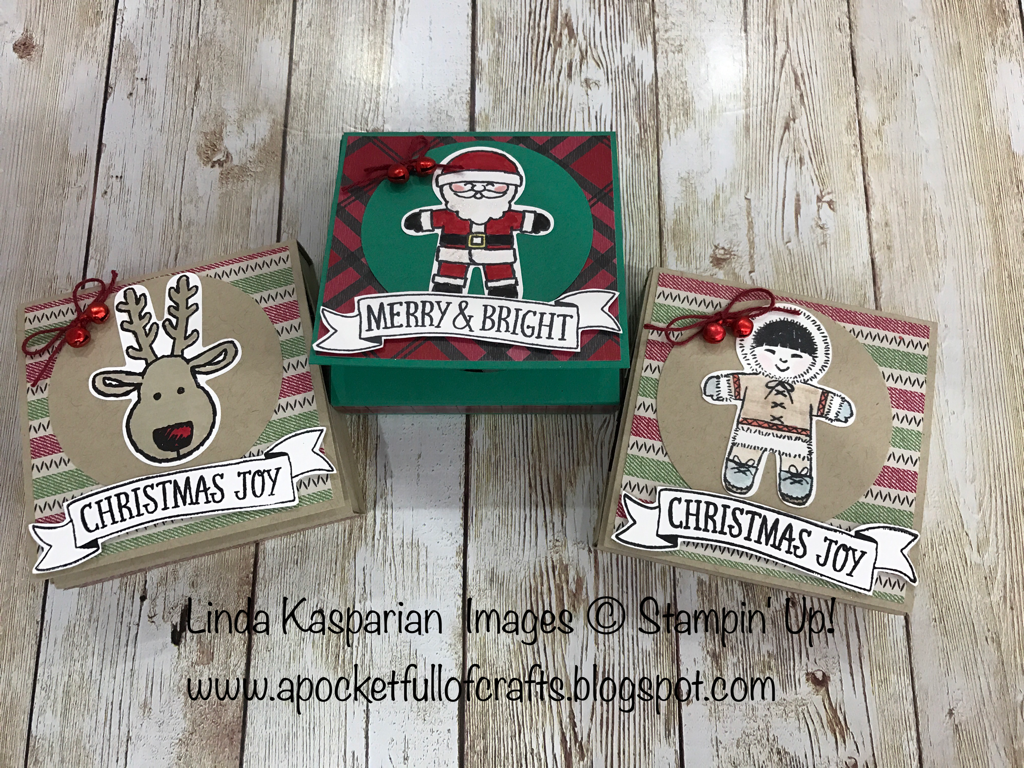
They are very easy to make. Stampin Fee has a tutorial on her blog and a PDF you can download.
Here are the basic instructions I followed...
Cut card stock at 29cm x 8cm
Score at 8, 10, 18, 20 & 28cm
Box part
Cut card stock at 11.6 cm x 11.6 cm
Score at 1.9 cm on all sides
Cut and stick as you would a usual box.
Decorate to your liking.
Thank you for looking.
Friday, 11 November 2016
Monday, 15 February 2016
Valentine Inspiration from a mug.
I used the baby wipe technique where you add drops of different coloured inks onto a baby wipe. Making sure you don't leave any gaps. Then use it as an ink pad and stamp as usual. You must remember to clean the stamp after each use or you will end up with a brown mess.
I couldn't decide which card to give to my husband. In the end I made him a different one using more traditional Valentine colours.
I was out shopping with my friends one evening and we went into a well known coffee shop. One of my friends was after a thermos type mug for when she is out on playground duty at school.
While we were in there, I got my eye on a lovely, colourful china mug which had a lid. It's perfect for when I'm crafting in my craft room. Time passes so quickly when I'm busy in there, and before you know it, the nice cuppa has gone stone cold. I am fussy and don't like the thermos type mugs as they have a plastic lid you have to drink through.
I love my new mug and it inspired me to make these cards...
I used the baby wipe technique where you add drops of different coloured inks onto a baby wipe. Making sure you don't leave any gaps. Then use it as an ink pad and stamp as usual. You must remember to clean the stamp after each use or you will end up with a brown mess.
I couldn't decide which card to give to my husband. In the end I made him a different one using more traditional Valentine colours.
He was very happy with it.
Case(ing) the Catty.
Stampin' Up! catalogues are full of inspiration and they love it for us to copy and share the ideas to everyone and anyone. As Valentines was coming up, I thought I would use these little heart frames and I love the idea in the catalogue so I copied it.
I also made a card to go with it.
It took a while to get back into stamping and making after the Christmas break.
Luckily we had team training in January and we all make swaps to hand out to everyone there, so I had to get my mojo back.
I had seen a card on pinterest using the Ballon Builder stamp set and came up with these cute little cards. Just shows how versatile the stamp sets can be with a bit of imagination.
Team training is a get together of our extended team of demonstrators. It is a great social occasion as well as lots of information and tip sharing between us all. We have a make and take session too. We used the new Going places DSP and the Going Global stamp sets.
These are a couple of cards I created when I got home, (you are supposed to make while you are there, but me and my fellow team mates usually end up chatting too much to concentrate).
If you would like to learn more about being a demonstrator, please message me and I'd be happy to
explain.
Christmas cards from 'me'
I had an idea to invite a few of my non crafty friends around to my craft studio and get them making their own Christmas cards from me.
They thought the idea was great and with the lure of nibbles and wine, they were there in no time.
This is the card they made from me haha! I may do this every year from now on.
I had it all cut ready for them. They really enjoyed themselves and a couple of them made a few more cards to give to others. It was a lovely evening and we did get a bit tipsy.
Catch up
Lovely vellum lanterns made using the curvy keepsake die. I put a battery operated tea light inside.
Oh wow! Time goes so quickly these days. I have so much to update on the Blog.
Where do I start???
After Brussels it was all go getting ready for a Christmas Fair.
Some of the items I made
These are lovely bags made using the 12x12 Designer Series Paper from Stampin' Up!
I got the idea from Elaine Jackson (Papercraft Button). She has a video tutorial. They are really easy once you get going. I added the poinsettia for the Christmas effect. They were very popular Teacher presents filled with a few chocolates or a gift card.
I also had fun making these
Lovely vellum lanterns made using the curvy keepsake die. I put a battery operated tea light inside.
These little wreath tea lights were popular too.
These Jolly Santas are wallets with a chocolate bar inside. They made very popular stocking fillers and teacher gifts.
I made these little 4x4 inch cards.
Here was my set up at the Shrewsbury House Christmas Fair December 2015
Tuesday, 17 November 2015
On Stage Live Brussels 2015 Swaps
Hello,
I then made the star for the outside of the treat bag. I got the inspiration from a wooden star decoration hanging on my door.
I hope you like it.
I also included a little chocolate in the bag as I know how much we like to receive yummy treats.
I will be back with some swaps I was lucky enough to receive.
Bye for now xxx
I've had such an exciting time in Brussels at the first ever Stampin' Up! On Stage Live.
I enjoyed convention last year so much, I just had to be back again. I wasn't disappointed.
The atmosphere and company is amazing and we get to meet so many new friends and spend time with old friends and fellow demos. I can't wait for the next get together.
One of the many exciting parts of being together is the swaps. We make as many swaps as we can, and swap with others. It's soooo lovely to see so many creative masterpieces, all hand made and it give you so many new ideas.
Here is the swap I made. I was planning to make 100, but it was proving to be an impossible task.
I ended up making 72.
I made the little scissor charm star from a YouTube video I watched and fell in love with it. If you search 'oragami puffy stars' you will find it. The attachment (phone charm) was from ebay.
I made the tiny box to put it in from a tutorial by Persephone's Papercraft. It's her 3x6 tiny box with lid
I then made the star for the outside of the treat bag. I got the inspiration from a wooden star decoration hanging on my door.
I hope you like it.
I also included a little chocolate in the bag as I know how much we like to receive yummy treats.
I will be back with some swaps I was lucky enough to receive.
Bye for now xxx
Sunday, 18 October 2015
Hello,
Can't believe how quickly this year is going. Just a quick entry to show the swap I made for our team training in October. Very early for Christmas I know, but us crafters have to make an early start.
We had to make 20 of these for each team member who attended.
I Made mine using some paper from the Seasonal catalogue, some tone on tone stamping and a few embellishments. Hope you like it.
This was just a quick post as I haven't posted in some time.
Lots of exciting things coming up for the rest of the year, including the Stampin' Up! On Stage Live event in Brussels next month. I can't wait!!!
I will have photos and what we got up to on my Blog. See you again soon.
Can't believe how quickly this year is going. Just a quick entry to show the swap I made for our team training in October. Very early for Christmas I know, but us crafters have to make an early start.
We had to make 20 of these for each team member who attended.
I Made mine using some paper from the Seasonal catalogue, some tone on tone stamping and a few embellishments. Hope you like it.
This was just a quick post as I haven't posted in some time.
Lots of exciting things coming up for the rest of the year, including the Stampin' Up! On Stage Live event in Brussels next month. I can't wait!!!
I will have photos and what we got up to on my Blog. See you again soon.
Wednesday, 13 May 2015
"Hallet Bag"
Im on a roll,
Let me show you my version of the 'Hallet Bag.' So called by my Dear friend Kim. It was originally made by another friend Caroline Hallet aka Craftyhallet (www.craftyhallet.co.uk). Her little bag took the internet by storm and everywhere you looked, people were making 'Hallet Bags'.
Here is my first attempt. It was just a practice, but it was much easier to make than I had imagined.
Let me show you my version of the 'Hallet Bag.' So called by my Dear friend Kim. It was originally made by another friend Caroline Hallet aka Craftyhallet (www.craftyhallet.co.uk). Her little bag took the internet by storm and everywhere you looked, people were making 'Hallet Bags'.
Here is my first attempt. It was just a practice, but it was much easier to make than I had imagined.
These bags are so cute. They would make a perfect little thank you gift. I have put 4 thank you cards and envelopes inside. If you would like to have a go making them, Caroline has a fabulous video on you tube. Just search Caroline Hallet Bag in a box.
I cased another version of the bag from fellow demo and Friend Kim Fee. Her link is on my sidebar. She is kimfeecrafter.blogspot.co.uk or Simplyfairies (I need to learn how to add the links, sorry.)
Here is the card I made, but please head over to her blog to see the original.
Butterfly Basics
Hello, It's been ages since I posted. Still not used to this blogging lark sorry.
Today I wanted to share a project I made a few weeks ago. It was inspired by a beautiful card a fellow demo had made. Her name is Yvonne Bevan and her blog is bspokecrafts.blogspot.co.uk Make sure you pop by and see her beautiful work.
I love making mini card sets and these are made using the Stampin' Up! Butterfly Basics stamp set and a few other bits I will list below.
The cards measure 9.5cm x 9.5cm and 10cm x 10cm envelopes.
Today I wanted to share a project I made a few weeks ago. It was inspired by a beautiful card a fellow demo had made. Her name is Yvonne Bevan and her blog is bspokecrafts.blogspot.co.uk Make sure you pop by and see her beautiful work.
I love making mini card sets and these are made using the Stampin' Up! Butterfly Basics stamp set and a few other bits I will list below.
The cards measure 9.5cm x 9.5cm and 10cm x 10cm envelopes.
Wednesday, 22 April 2015
Painted Petals DSP Card Gift Box.
At my recent Stampin Up! Party that my friend Olga hosted for me, I demonstrated this card gift box and gave it to her as a thank you for hosting the party. For her gift I had used the purple paper, so I thought this time I would use the blue. The embellishment on the flower has retired, but you could use the Something Borrowed embellishment which is very similar.
It contains six 4x4 inch assorted cards and envelopes, all using the Painted Petals DSP and Stamp Set.
Box Measurements
The box measures 7.5 inches x 7.5 inches, score at 1.5 inches all sides.
The lid is 7.5 inches PLUS 1/16 of an inch x 7.5 PLUS 1/16 of an inch (hope that makes sense), this makes the lid a tiny bit bigger to fit on top of the base. I cut a square of contrasting card stock and stuck it inside the lid for a bit of stability.
Score 1.5 inches all sides.
I then cut off 1.5cm (cm not inches) all around the lid so it is shorter and you can see the blue base.
It contains six 4x4 inch assorted cards and envelopes, all using the Painted Petals DSP and Stamp Set.
The finished box measures 4.5 inches x 4.5 inches.
Box Measurements
The box measures 7.5 inches x 7.5 inches, score at 1.5 inches all sides.
The lid is 7.5 inches PLUS 1/16 of an inch x 7.5 PLUS 1/16 of an inch (hope that makes sense), this makes the lid a tiny bit bigger to fit on top of the base. I cut a square of contrasting card stock and stuck it inside the lid for a bit of stability.
Score 1.5 inches all sides.
I then cut off 1.5cm (cm not inches) all around the lid so it is shorter and you can see the blue base.
I have used the now retiring Blossom Punch to make the flower on the lid. You would have to be quick if you wish to order it as things are selling out fast. I'm very upset this punch is retiring.
Built for Free Using: My Stampin Blog
Sunday, 19 April 2015
Butterfly Card
Here is a card I made a few days ago. It's made entirely from Stampin Up! products. I will list the products used a bit later but for now, here is the card.
Here are the products I used.
Friday, 17 April 2015
Getting Started
Hello, and welcome to my Blog. I would like to thank my dear friends Lesley and Kim for giving me the push and getting me to start a blog.
I would especially like to thank Lesley Lendon for all her help in setting up the blog.I'm just starting out and have a lot to learn. Excited and scared at the same time. xxx
Subscribe to:
Posts (Atom)


